Let’s build an Express web server and deploy to an Azure virtual machine using infrastructure as code.
As part of this blog series, we will be walking through how to set up an Express application, create our cloud infrastructure using Terraform, and finally automating our code deployments with GitHub Actions. This is part two of three where we will be building out our Express server. If you already feel comfortable with Terraform, feel free to skip to part 3 where we will be creating a GitHub action to automate our deployments to our virtual machine!
What We Will Be Doing
- Creating a basic “Hello World” Express Server
- Write our infrastructure as code utilizing Terraform (this post)
- Creating a GitHub Action to automate deploying code changes to our virtual machine
Tools Required
What is Terraform?
Terraform is an infrastructure as code tool that lets you build, change, and version cloud and on-prem resources safely and efficiently.
Terraform allows us to manage our infrastructure using code.
Setting Up Our Infrastructure
Within the root of our project, let’s create a new directory called infrastructure. This folder will hold all of our Terraform code. Within that folder, create the following files:
main.tfoutputs.tfproviders.tfterraform.tfvarsvariables.tf
Now you structure should look like this:
📂infrastructure/
├── main.tf
├── outputs.tf
├── providers.tf
├── terraform.tfvars
└── variables.tf
Now that we have setup our files, let’s get to defining our infrastructure!
Defining Our Providers
Terraform allows us to interact with different cloud provider and other APIs through what are known as providers. To enable Terraform to manage our Azure infrastructure, we need to add the Azure provider to our code. Open up the providers.tf file and add the following block of code:
terraform {
  required_providers {
    azurerm = {
      source  = "hashicorp/azurerm"
      version = "~>3.38.0"
    }
  }
}

provider "azurerm" {
  features {}
}
Here we are telling Terraform that the provider azurerm is a required provider and we require version 3.38.0 (the latest at the time of writing) or greater.
We also want to add one more provider that will be used for our SSH keys, and that is the tls provider. Similar to what we did with the Azure provider, we can add the following block within the required_providers block:
tls = {
  source  = "hashicorp/tls"
  version = "~>4.0"
}
To recap, we are telling Terraform we are requiring the tls provider and want a version greater than or equal to 4.0.
Adding Variables
Now we want to define some variables we can use in our infrastructure. Variables allow use to substitute values in so we can easily change certain configuration options. To declare variables, let’s open up the variables.tf file. We can create variables with the following syntax:
variable "" {
  type        =
  default     = ""
  description = ""
}
Adding Our Resource Location Variable
Let’s start with location. This is going to be the region you want to deploy your Azure infrastructure. I’m going to set the default to East US, but feel free to pick whichever region you’d like!
variable "location" {
  type        = string
  default     = "eastus"
  description = "Location to deploy the resources."
}
Create Variables for Our Resource Names
I’m also going to define two more variables to be used for naming our resources.
variable "project" {
  type        = string
  description = "Name of project (all lowercase and no special characters)"
}

variable "environment" {
  type        = string
  description = "The application environment"
}
Create Variables for Virtual Machine Configuration
The rest of the variables will be used for creating our virtual machine configuration.
variable "vm_size" {
  type        = string
  default     = "Standard_B1ls"
  description = "The Azure VM Size"
}

variable "vm_username" {
  type        = string
  default     = "azureuser"
  description = "The username for the virtual machine"
}

variable "vm_computer_name" {
  type        = string
  description = "The computer name for the virtual machine (not the resource name)"
}

variable "vm_source_image_publisher" {
  type        = string
  default     = "Canonical"
  description = "The VM image publisher"
}

variable "vm_source_image_offer" {
  type        = string
  default     = "UbuntuServer"
  description = "The VM image OS"
}

variable "vm_source_image_sku" {
  type        = string
  default     = "18.04-LTS"
  description = "The VM image OS version"
}
Now we want to actually set values for our variables. We can do this through the use of a .tfvars file. If you're like me and are used to the Node world, this is similar to a .env file.
Inside our terraform.tfvars file, go ahead and set values for the following variables:
location    = "eastus"
project     = "expressweb"
environment = "dev"

# Virtual Machine variables
vm_size                   = "Standard_B1ls"
vm_username               = "azureuser"
vm_computer_name          = "expresswebserver"
vm_source_image_publisher = "Canonical"
vm_source_image_offer     = "UbuntuServer"
vm_source_image_sku       = "18.04-LTS"
That wraps up our Terraform variables, next we can get started on defining our infrastructure!
Defining Our Infrastructure Resources
Creating a Resource Group
In Azure, all our resources will be under a resource group. We will need to define a name and location for our resource group, and this is where our variables come in to help us out. Open up main.tf and add the following:
resource "azurerm_resource_group" "express_server_rg" {
  name     = "rg-${var.project}-${var.environment}-001"
  location = var.location
}
Here we are using the azurerm_resource_group resource to define the configuration for our Azure resource group. If you used the same variable values as me, we are configuring the name to be “rg-expressserver-dev-001” and setting the location to be East US.
Creating the Network Components
Before we create the virtual machine, we need to set up all of our networking components. This includes a virtual network, subnet, public IP address, network security group, and network interface.
resource "azurerm_virtual_network" "express_server_network" {
  name                = "vnet-${var.project}-${var.environment}-001"
  address_space       = ["10.0.0.0/16"]
  location            = azurerm_resource_group.express_server_rg.location
  resource_group_name = azurerm_resource_group.express_server_rg.name
}

resource "azurerm_subnet" "express_server_subnet" {
  name                 = "snet-${var.project}-${var.environment}-001"
  resource_group_name  = azurerm_resource_group.express_server_rg.name
  virtual_network_name = azurerm_virtual_network.express_server_network.name
  address_prefixes     = ["10.0.1.0/24"]
}

resource "azurerm_public_ip" "express_server_public_ip" {
  name                = "pip-${var.project}-${var.environment}-001"
  location            = azurerm_resource_group.express_server_rg.location
  resource_group_name = azurerm_resource_group.express_server_rg.name
  allocation_method   = "Dynamic"
}

resource "azurerm_network_security_group" "express_server_nsg" {
  name                = "nsg-${var.project}-${var.environment}-001"
  location            = azurerm_resource_group.express_server_rg.location
  resource_group_name = azurerm_resource_group.express_server_rg.name

  security_rule {
    name                       = "ssh"
    priority                   = 1001
    direction                  = "Inbound"
    access                     = "Allow"
    protocol                   = "Tcp"
    source_port_range          = "*"
    destination_port_range     = "22"
    source_address_prefix      = "*"
    destination_address_prefix = "*"
  }
  security_rule {
    name                       = "http"
    priority                   = 1002
    direction                  = "Inbound"
    access                     = "Allow"
    protocol                   = "Tcp"
    source_port_range          = "*"
    destination_port_range     = "80"
    source_address_prefix      = "*"
    destination_address_prefix = "*"
  }
}

resource "azurerm_network_interface" "express_server_nic" {
  name                = "nic-${var.project}-${var.environment}-001"
  location            = azurerm_resource_group.express_server_rg.location
  resource_group_name = azurerm_resource_group.express_server_rg.name

  ip_configuration {
    name                          = "express_server_nic_configuration"
    subnet_id                     = azurerm_subnet.express_server_subnet.id
    private_ip_address_allocation = "Dynamic"
    public_ip_address_id          = azurerm_public_ip.express_server_public_ip.id
  }
}

resource "azurerm_network_interface_security_group_association" "express_server_security_group_assoc" {
  network_interface_id      = azurerm_network_interface.express_server_nic.id
  network_security_group_id = azurerm_network_security_group.express_server_nsg.id
}
Create a Storage Account for Boot Diagnostics
Next, we will create a storage account to store our boot diagnostics in case we need to analyze the logs. Notice for the name there are no hyphens as a storage account name cannot contain hyphens.
resource "azurerm_storage_account" "express_server_storage_account" {
  name                     = "stvm${var.project}${var.environment}001"
  location                 = azurerm_resource_group.express_server_rg.location
  resource_group_name      = azurerm_resource_group.express_server_rg.name
  account_tier             = "Standard"
  account_replication_type = "LRS"
}
Create Our SSH Key
Next, let’s create a resource to generate an ssh key we can use to connect to our VM once created.
resource "tls_private_key" "generated_ssh_key" {
  algorithm = "RSA"
  rsa_bits  = 4096
}
Defining Our User Data File
Before we proceed with defining our virtual machine, we will want to create a user data file. This file will run once the virtual machine has been created and has started. This allows us to install packages and run commands automatically. For our application, we will need a couple of packages:
- Ngnix
- Nodejs
We will also need to create an Nginx config to set up our reverse proxy as well as install pm2 with npm. Inside of the infrastructure directory, create a file named cloud-init.yml. Open the file up and paste in the following contents:
#cloud-config
package_update: true
package_upgrade: true
packages:
    - nginx
write_files:
    - owner: www-data:www-data
      path: /etc/nginx/sites-available/default
      content: |
          server {
            listen 80;
            location / {
              proxy_pass http://localhost:5000;
              proxy_http_version 1.1;
              proxy_set_header Upgrade $http_upgrade;
              proxy_set_header Connection keep-alive;
              proxy_set_header Host $host;
              proxy_cache_bypass $http_upgrade;
            }
          }
runcmd:
    - service nginx restart
    - 'curl -sL https://deb.nodesource.com/setup_16.x | sudo -E bash -' # Set up node repo to install node 16
    - 'sudo apt-get install -y nodejs'
    - 'sudo npm install pm2 -g' # Used for managing Express server
Now to define this resource in our Terraform file, open main.tf again and add the following:
data "template_file" "user_data" {
  template = file("./cloud-init.yml")
}
Creating The Virtual Machine Config
To create our virtual machine, we’ll need to configure a few different things.
resource "azurerm_linux_virtual_machine" "express_server_vm" {
  name                  = "vm-${var.project}-${var.environment}-001"
  location              = azurerm_resource_group.express_server_rg.location
  resource_group_name   = azurerm_resource_group.express_server_rg.name
  network_interface_ids = [azurerm_network_interface.express_server_nic.id]
  size                  = var.vm_size

  user_data = base64encode(data.template_file.user_data.rendered)

  os_disk {
    name                 = "osdisk-${var.project}-${var.environment}-001"
    caching              = "ReadWrite"
    storage_account_type = "Standard_LRS"
  }

  source_image_reference {
    publisher = var.vm_source_image_publisher
    offer     = var.vm_source_image_offer
    sku       = var.vm_source_image_sku
    version   = "latest"
  }

  computer_name                   = var.vm_computer_name
  admin_username                  = var.vm_username
  disable_password_authentication = true

  admin_ssh_key {
    username   = var.vm_username
    public_key = tls_private_key.generated_ssh_key.public_key_openssh
  }

  boot_diagnostics {
    storage_account_uri = azurerm_storage_account.express_server_storage_account.primary_blob_endpoint
  }
}
Creating Outputs
Finally, we want to define our outputs. These will be the values that get outputted by Terraform once the apply is complete. To SSH into our VM, we will need the IP address, the username, and the SSH key. Open up outputs.tf and define the following three outputs:
output "vm_ip_address" {
  value = azurerm_linux_virtual_machine.express_server_vm.public_ip_address
}

output "vm_username" {
  value = azurerm_linux_virtual_machine.express_server_vm.admin_username
}

output "ssh_private_key" {
  value     = tls_private_key.generated_ssh_key.private_key_pem
  sensitive = true
}
Using the Terraform CLI
Initializing Terraform
Now that we have all the code in place, it’s time to create our infrastructure. First cd into the infrastructure directory. Next, run the following Terraform CLI command:
terraform initYou should see output similar to the following screenshot:
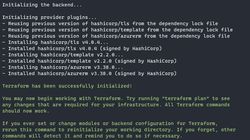
Now we have successfully initialized Terraform!
Checking the Terraform Plan
Before we proceed further, let’s check what Terraform plans to do with:
terraform planYou should see a lot of values with a green plus mark next to them which denotes these will all be added once we apply these changes.
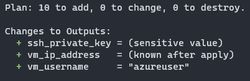
Now we are ready to apply these changes!
Applying Our Infrastructure
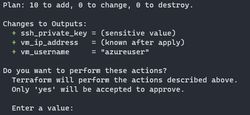
Now that the proposed changes look good, let’s actually create our infrastructure! We can run the following command:
terraform applyThe output will look very similar to the plan command, and now it will prompt you to confirm these changes, You can enter yes into the terminal to start creating the infrastructure.
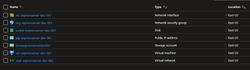
If the creation was successful, you should see the following message:

Note the outputs below as we will need these for our next step. We can verify all our infrastructure was created by going to Azure portal and finding the resource group we created. Within the resource group, you should see the following resources:
Connecting to the Virtual Machine
Using our outputs, we will have everything we need to connect to our virtual machine. You’ll notice for the ssh_private_key that the value was not outputted and you may be wondering how we can view that value. Terraform provides us with the output command that we can use to view outputs. To view the value of the ssh key, we can do the following:
terraform output -raw ssh_private_keyThis will output the value out ssh_private_key as raw text in the terminal. What we will want to do is use this output to create an SSH key file and use that to SSH into our virtual machine which can be done with the following command:
terraform output -raw ssh_private_key > ssh_key && chmod 400 ssh_keyNow we can use the newly created SSH key file to SSH into our virtual machine:
ssh -i ssh_key $(terraform output -raw vm_username)@$(terraform output -raw vm_ip_address)Once you acknowledge the host authenticity, you should now be successfully connected to the VM! Let’s check to see if Node is installed on the VM with node -v. If you see a version number outputted, then Node was successfully installed!

Wrap Up
In this post, we have went ahead and created all the cloud infrastructure required to get our virtual machine up and running with Node and Nginx! In the next post, we will be creating a GitHub Action to automate our code deployments to the virtual machine.