Let’s build an Express web server and deploy to an Azure virtual machine using infrastructure as code.
As part of this blog series, we will be walking through how to set up an Express application, create our cloud infrastructure using Terraform, and finally automating our code deployments with GitHub Actions. This is part three of three where we will be creating a GitHub Action to automate deploying our code to the virtual machine!
What We Will Be Doing
- Creating a basic “Hello World” Express Server
- Write our infrastructure as code utilizing Terraform
- Creating a GitHub Action to automate deploying code changes to our virtual machine (this post)
Tools Required
What Are GitHub Actions?
GitHub Actions is a continuous integration and continuous delivery (CI/CD) platform that allows you to automate your build, test, and deployment pipeline. You can create workflows that build and test every pull request to your repository, or deploy merged pull requests to production.
GitHub Actions allow us to create CI/CD workflows for building, testing, and deploying our applications. We will be using this service to automate deploying our Express web server to our virtual machine.
Setting up Our Action Secrets
Before we begin creating the action, let’s create all secrets required to run the workflow. We will need the following 3 secrets:
HOSTSSH_KEY_BASE64USERNAME
Getting Secret Values from Terraform
First, we need to get the values for the secrets. If you remember in the previous post, we created outputs from Terraform. We are going to want to grab the values of the outputs for this step. We can do this by running:
terraform output -raw <output name>So if we wanted the value for the VM username, we would run:
terraform output -raw vm_usernameThis will output the value in the terminal and we can copy this value to our clipboard to use in the next steps.
Adding Our Secrets Through GitHub
On our repository page, let’s navigate to Settings:

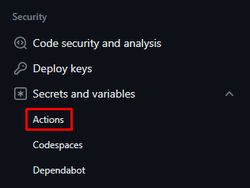
Under Security > Secrets and variables, click “Actions”:
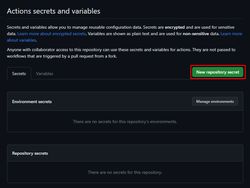
Inside Actions secrets, click “New repository secret”
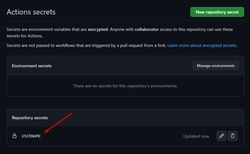
Let’s start with the USERNAME secret. Enter USERNAME for the secret name, and paste in the value from Terraform in the Secret text area.

Once, you have added the correct value, click “Add secret”. You should now see the secret on the Actions secrets page!
The same steps apply for the other secrets, but I wanted to add a note on the SSH_KEY_BASE64 value. I had issues getting the SSH value to work correctly with GitHub Actions, so the best solution I found was to encode it to base 64. We can add an extra command to our terraform output to convert the value for us:
terraform output -raw ssh_private_key | base64Now that we have all the secrets set up, we can start creating our workflow file.
Create File Structure
Going back to our code, to inform GitHub that we have a workflow we want to run, let’s create the following file structure in the root of our directory:
.github/
├── workflows/
│   └── deploy_to_vm.yml
We want to create it exactly like above as this specific directory structure is what’s used for GitHub Actions.
What we are creating is called a “Workflow”. Workflows are configurable automated processes that can run one or more jobs.
Defining When We Want the Workflow to Run
Let’s start by adding a name for our action. I’ll call it “Deploy to Azure VM”.
name: Deploy to Azure VMInside our workflow file, we will need to define when we want the workflow to run. I’m going to set the trigger to when there is a push to the main branch. That way every time there is a code change to our main branch, we can redeploy our server.
on:
    push:
        branches: ['main']
    workflow_dispatch:
Creating Our Job
Now that we have a defined trigger, what do we want to actually do? This is where jobs come in. A job is a set of steps inside a workflow. I’ll start by defining our job as deploy-files-to-vm and I want this job to run on ubuntu-latest.
jobs:
    deploy-files-to-vm:
        runs-on: ubuntu-latest
Our workflow file should now look like this:
name: Deploy to Azure VM

on:
    push:
        branches: ['main']
    workflow_dispatch:

jobs:
    deploy-files-to-vm:
        runs-on: ubuntu-latest
Creating Steps
Now let’s think about how we want to approach this problem. Ideally we want to copy all files to our virtual machine, stop the server, install the dependencies, and start the server.
Setting up Steps
steps:
    - uses: actions/checkout@v3
    - name: Copy files with rsync and start server
      run: |
To set up our steps, let’s add the the steps property. Next we want to add the uses property with the value actions/checkout@v3. This is telling GitHub to checkout your repository onto the runner, which will allow us to run actions against our code. Next we will add run to execute our commands which we will begin creating below.
Setting up the SSH Key
Before we begin moving files to our VM, we first need to set up our SSH key to connect to the VM. To start, we want to add the public key of our Azure virtual machine to the GitHub Actions virtual machine running our job. We are using the Linux utility ssh-keyscan to gather the public SSH host key of our VM. That way, we can connect with SSH without being prompted to trust the fingerprint. We then want to take the output of sshkey-scan, and add it to the known_hosts file. The known_hosts file stores the public keys of hosts accessed by a user. The -H flag hashes the hostname and address in the output.
run: |
	ssh-keyscan -H $ > known_hosts
Next, we need to take the SSH key we generated from our Terraform deployment, decode it from base 64, output it to a file on our runner, and change file permissions. The Azure VM expects our SSH key file to have the permissions of 400 which makes the file read only to you. We can add the new line below to set up our SSH key:
echo "$" | base64 -d > ssh_key && chmod 400 ssh_keyNow we are ready for the rsyc operation.
Copying Files Via Rsync
What is rysnc?
rsync is a utility for efficiently transferring and synchronizing files between a computer and a storage drive and across networked computers by comparing the modification times and sizes of files.
We can use rsync to copy our files over SSH. We will use the SSH key created in the previous step on the GitHub Actions machine to connect to our VM. We want to copy the src directory and the package.json file to the server. To do that, let’s add the following command:
rsync -avz -e "ssh -o GlobalKnownHostsFile=known_hosts -i ssh_key" ./src package.json $@$:~/srv/Here we are saying I’d like to copy the local files to the ~/srv directory on the VM.
The rsync -a flag is known as “archive” and syncs file recursively which preserves things like permissions, symbolic links, and modification times. The -v flag is for verbose, which adds more output to our terminal. The -z flag is for adding compression.
The ssh -o flag is used for passing in options, and we want to tell SSH that our GlobalKnownHostsFile is known_hosts, which has the host information we retrieved earlier from ssh-keyscan. The -i flag is used to tell SSH where our key file is.
Restarting the Server
Now that we have copied the files, we want to restart the server to apply the latest changes. Again we will be using the SSH key from the previous step to SSH into the server and run a few commands.
ssh -o GlobalKnownHostsFile=known_hosts -i ssh_key $@$ /bin/bash <<'EOT'The above command SSHs into the server, then runs a command in the VM’s bash terminal, which is what /bin/bash <<'EOT' is doing. The << is what’s known as a here document, which is a special purpose code block that uses I/O direction to feed a command list to an interactive program.
Once we have connected, we need to switch to the directory that has our code, stop the pm2 process, install dependencies, and start the pm2 process again. Here are the commands for that:
cd ./srv
pm2 stop express_web_server 2> /dev/null
npm install
npm start
EOT
That’s it, we now have an automated way of deploying our application code! Once last thing to add is we want to tell GitHub Actions that we are using bash as our shell:
shell: bashAnd here is the complete GitHub Action:
name: Deploy to Azure VM

on:
    push:
        branches: ['main']
    workflow_dispatch:

jobs:
    deploy-files-to-vm:
        runs-on: ubuntu-latest
        steps:
            - uses: actions/checkout@v3
            - name: Copy files with rsync and start server
              run: |
                  ssh-keyscan -H $ > known_hosts
                  echo "$" | base64 -d > ssh_key && chmod 400 ssh_key
                  echo SSH key file created with correct permissions!
                  rsync -avz -e "ssh -o GlobalKnownHostsFile=known_hosts -i ssh_key" ./src package.json $@$:~/srv/
                  echo Files copied to host!
                  ssh -o GlobalKnownHostsFile=known_hosts -i ssh_key $@$ /bin/bash <<'EOT'
                  cd ./srv
                  pm2 stop express_web_server 2> /dev/null
                  npm install
                  npm start
                  EOT
                  echo Application started!
              shell: bash
Running the Workflow
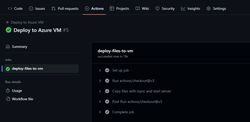
To actually run the workflow, let’s commit these changes and push to our GitHub repository. Once the changes are pushed, navigate to the Actions tab, and you should see the workflow running.

If everything is successful, you should see the output
Checking on Our Deployed Changes
Now we can enter in the IP address of our VM into the browser and you should be greeted with “Hello World”!